Bulk Delete via Power Automate
Bulk Delete has been around since the early days of Dynamics 365. The classic bulk delete interface has a number of limitations. Let’s see if we can use Power Automate to improve on the classic bulk delete.
Bulk Delete
Classic Bulk Delete exists within the ‘Advanced Settings’ area (Settings -> Data Management -> Bulk Record Deletion). There currently isn’t an equivalent in the maker portal or power platform admin center. A Bulk Delete job can be created using an ‘advanced find’ style interface and executed once or multiple times. It has the following limitations:
- We can’t edit a bulk delete job once it’s scheduled
- We have to create bulk delete job manually in each environment
- A single bulk delete job cannot be scheduled to run more frequently than once per day; for more frequent or non-standard recurrences duplicate bulk delete jobs are required.
- We cannot conditionally determine whether a bulk delete job runs, we must pause and restart the bulk delete job manually.
Power Automate Bulk Delete
The Dataverse Connector exposes a BulkDelete WebAPI call via an unbound action with the following parameters:
- JobName the name of the bulk delete job.
- QuerySet defining the criteria for the tables and rows to delete.
- SendEmailNotification, ToRecipients, CCRecipients to control the sending and destination of email notications.
- RecurrencePattern an optional recurrency pattern
- StartDateTime when the bulk delete job should run
- SourceImportId used when deleting a dataset previously imported. I’ve never had a use to set this via Power Automate.
- RunNow confusingly, this is an internal field, and should always be set to
False.
The bulk delete action returns a BulkDeleteResponse containing an asynchronous JobId. The output of an asynchronous job can be run by querying the BulkDeleteOperation table with the JobId.
Example
In the example below we are deleting all records in table pgc_widget where pgc_changedon is more than four hours ago. (i.e. less than addHours(utcNow(), -4). )
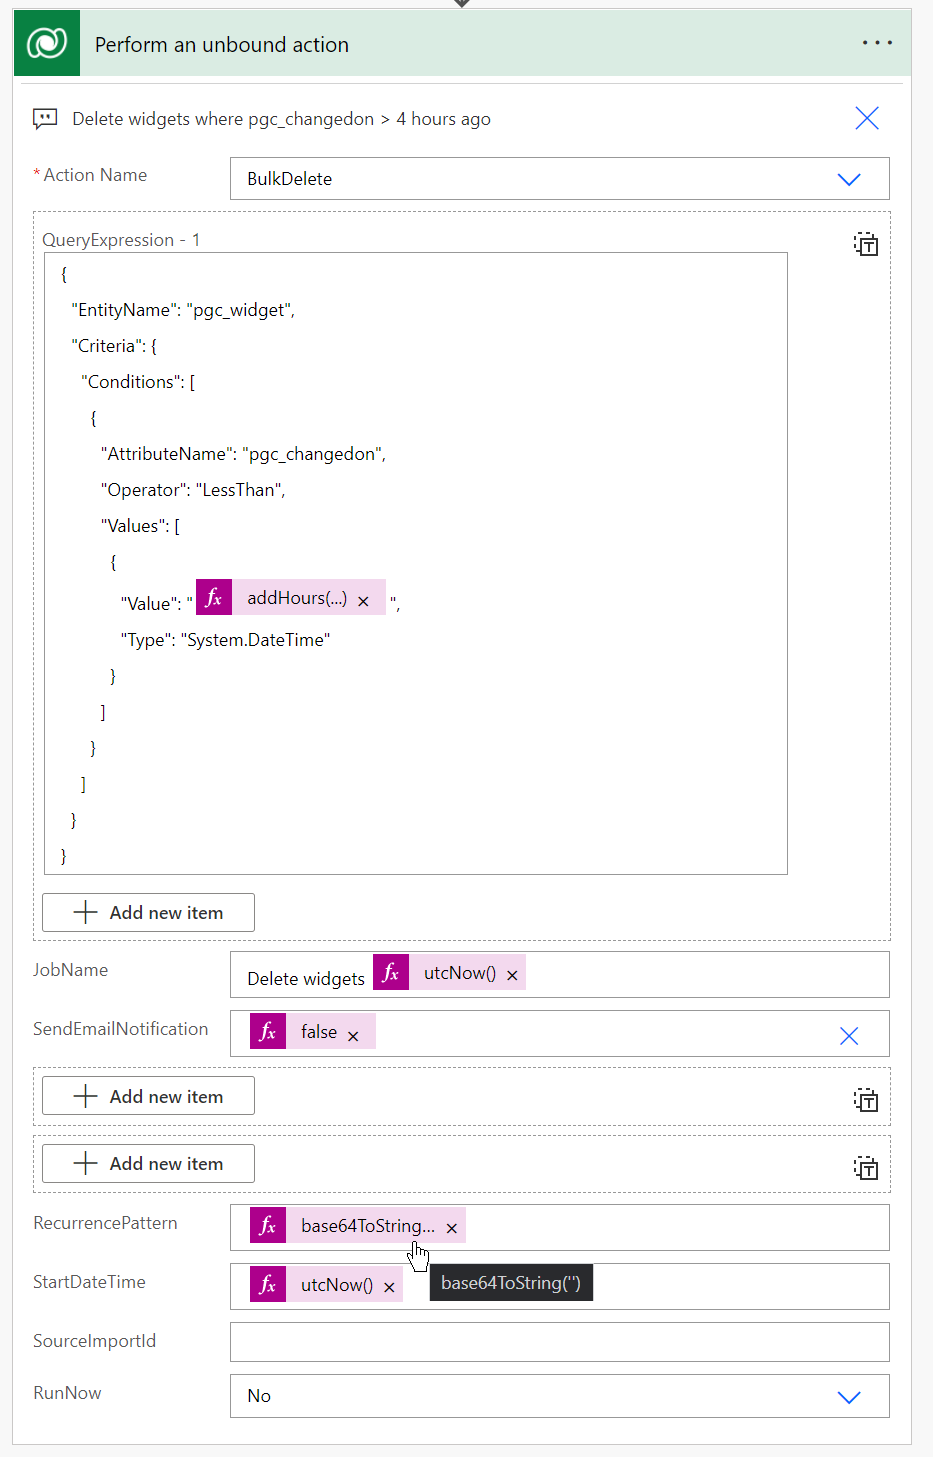
Query Expression
The query expression is probably the trickiest part to deterimine. The basic layout is explained in the QueryExpression documentation. I had to enlist the help of Microsoft support to understand the Object complex type used within the ConditionExpression. Since there is minimal documentation regarding the Object complex type the following examples may help.
String column
Delete all contacts with firstname Fred
[
  {
    "EntityName": "contact",
    "Criteria": {
      "FilterOperator": "And",
      "Conditions": [
        {
          "AttributeName": "firstname",
          "Operator": "Equal",
          "Values": [
            {
              "Value": "fred",
              "Type": "System.String"
            }
          ]
        }
      ]
    }
  }
]
Whole Number column
Delete all accounts with less than 75 employees. “System.String” type works also here.
[
  {
    "EntityName": "account",
    "Criteria": {
      "Conditions": [
        {
          "AttributeName": "numberofemployees",
          "Operator": "LessThan",
          "Values": [
            {
              "Value": "75",
              "Type": "System.Int32"
            }
          ]
        }
      ]
    }
  }
]
Date Column
Delete all contacts with birthdays before 1st Jan 1800 00:00 UTC
[
  {
    "EntityName": "contact",
    "Criteria": {
      "Conditions": [
        {
          "AttributeName": "birthday",
          "Operator": "LessThan",
          "Values": [
            {
              "Value": "1800-01-01T00:00:00Z",
              "Type": "System.DateTime"
            }
          ]
        }
      ]
    }
  }
]
Status column
Delete all inactive accounts
[
  {
    "EntityName": "account",
    "Criteria": {
      "Conditions": [
        {
          "AttributeName": "statecode",
          "Operator": "Equal",
          "Values": [
            {
              "Value": "1",
              "Type": "System.Int32"
            }
          ]
        }
      ]
    }
  }
]
Choice column
Delete all inactive accounts
[
  {
    "EntityName": "pgc_widget",
    "Criteria": {
      "Conditions": [
        {
          "AttributeName": "statuscode",
          "Operator": "Equal",
          "Values": [
            {
              "Value": "100000000",
              "Type": "System.Int32"
            }
          ]
        }
      ]
    }
  }
]
Lookup Column
Delete all accounts with a particular primary contact.
[
  {
    "EntityName": "account",
    "Criteria": {
      "Conditions": [
        {
          "AttributeName": "primarycontactid",
          "Operator": "Equal",
          "Values": [
            {
              "Value": "172c73fa-1e56-ec11-8f8f-0022482c87a3",
              "Type": "System.String"
            }
          ]
        }
      ]
    }
  }
]
Currency column
Delete all accounts with credit limit >= 500.
[
  {
    "EntityName": "account",
    "Criteria": {
      "Conditions": [
        {
          "AttributeName": "creditlimit",
          "Operator": "GreaterEqual",
          "Values": [
            {
              "Value": "500",
              "Type": "System.String"
            }
          ]
        }
      ]
    }
  }
]
Summary of the Object type
Condensing the examples above, the ‘Type’ required for each of the different dataverse column types is below:
| Field Type | Complex Type |
|---|---|
| String | System.String |
| Date | System.DateTime |
| Status | System.Int32 |
| Choice (Optionset) | System.String |
| Lookup | System.String |
| Currency | System.String |
| Whole Number | System.String or System.Int32 |
| Decimal Number ** | System.Decimal |
| Floating Point ** | System.Double |
** Not shown above
Add conditions
Beware, by default conditions appear to be ‘or’-ed, which is different to normal FetchXml or QueryExpressions which are ‘and’-ed.
Note here we have a ‘FilterOperator’ with a value of ‘And’
[
  {
    "EntityName": "pgc_widget",
    "Criteria": {
      "FilterOperator": "And", // <- Note FilterOperator
      "Conditions": [
        {
          "AttributeName": "pgc_changedon",
          "Operator": "LessThan",
          "Values": [
            {
              "Value": "2021-12-05T19:13:50.4271251Z",
              "Type": "System.DateTime"
            }
          ]
        },
        {
          "AttributeName": "statuscode",
          "Operator": "Equal",
          "Values": [
            {
              "Value": "100000000",
              "Type": "System.String"
            }
          ]
        }
      ]
    }
  }
]
Or conditions
Or conditions are similar to above, except with a FilterOperator of Or.
Generating the serialised query expressions
I couldn’t find any tools to simply generate a serialised WebAPI expression. The closest I could find is to use FetchXml Builder to create c# code for a query expression, then use a small .net Core 6 program to generate the serialised json and finally tweak the JSON to match the requirements.
The small .net Core 6 script is as shown:
using System.Text.Json;
using System.Text.Json.Serialization;
using Microsoft.Xrm.Sdk.Query;

// START: Copy from FetchXml Builder
// Instantiate QueryExpression query
var query = new QueryExpression("account");

// Add all columns to query.ColumnSet
query.ColumnSet.AllColumns = true;

// Define filter query.Criteria
query.Criteria.AddCondition("name", ConditionOperator.BeginsWith, "AA");
// END: Copy from FetchXml Builder

// Add custom serialiser to so that enums are converted to text,
// without this 'Or' is output as 0, etc.
var options = new JsonSerializerOptions
{
    WriteIndented = true,
    Converters =
    {
        new JsonStringEnumConverter(JsonNamingPolicy.CamelCase),
    },
    DefaultIgnoreCondition = JsonIgnoreCondition.WhenWritingDefault
};

// Initially power automate expects a list of query expressions
Console.WriteLine(JsonSerializer.Serialize(new List<QueryExpression> { query }, options));
which gives the following output:
[
  {
    "PageInfo": {},
    "LinkEntities": [],
    "Criteria": {
      "Conditions": [
        {
          "AttributeName": "name",
          "Operator": "beginsWith",
          "Values": ["AA"]
        }
      ],
      "Filters": []
    },
    "Orders": [],
    "EntityName": "account",
    "ColumnSet": {
      "AllColumns": true,
      "Columns": [],
      "AttributeExpressions": []
    }
  }
]
To use this in an action we can shorten it and had make some manual tweaks to:
- Fix the
Valuesparameters - Uppercase the
Operatorproperty to match the ConditionOperator values.
[
  {
    "EntityName": "account",
    "Criteria": {
      "Conditions": [
        {
          "AttributeName": "name",
          "Operator": "BeginsWith",
          "Values": [
            {
              "Type": "System.String",
              "Value": "AA"
            }
          ]
        }
      ]
    }
  }
]
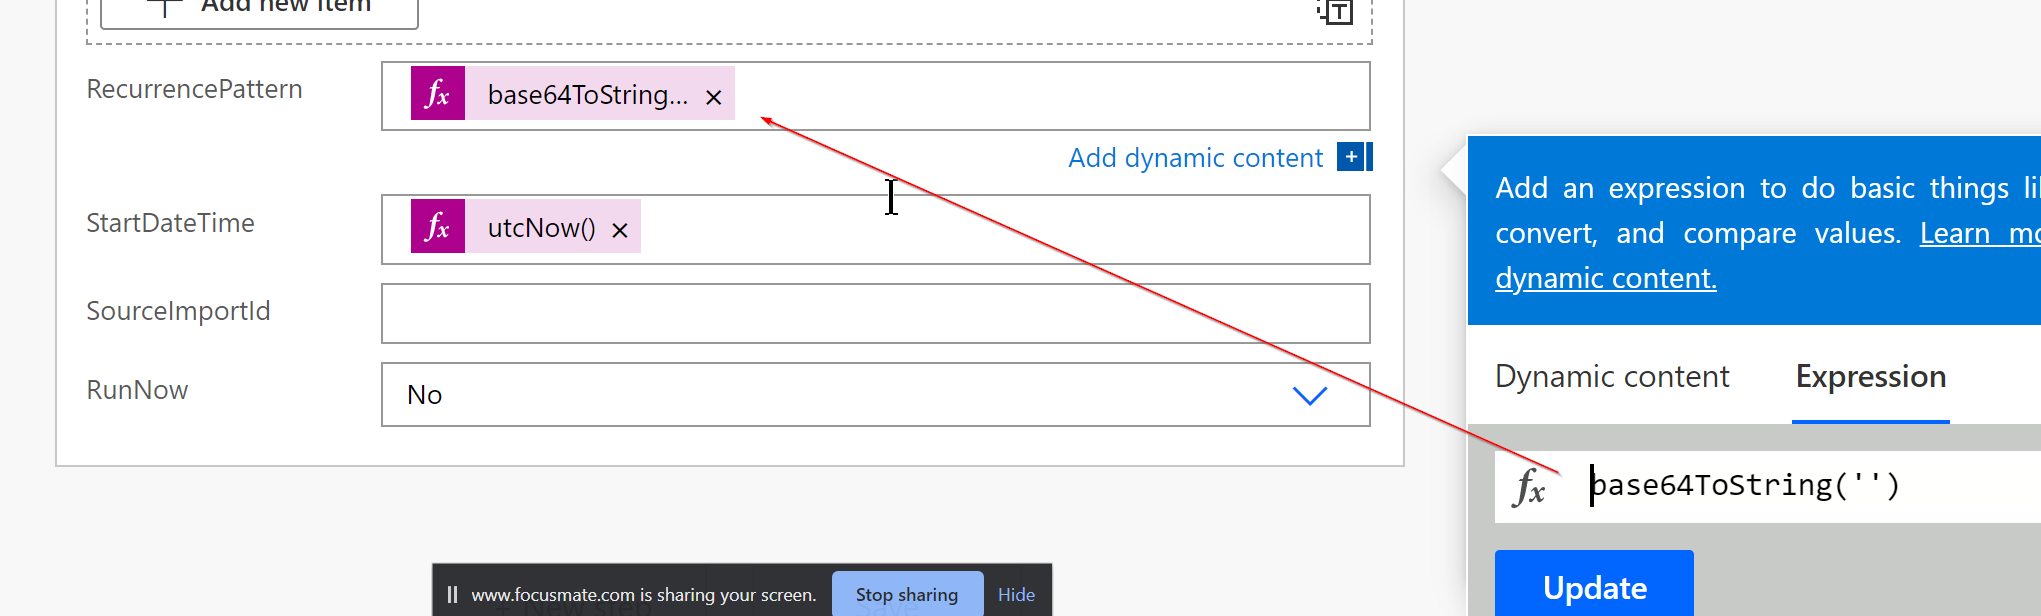
Recurrence patterns
The recurrence pattern is a required field when calling via Power Automate. The normal recurrence pattern is every ‘interval’ days, as can be seen below.

To allow Power Automate to handle the recurrence we must call the action with an empty recurrence pattern. To do this the base64ToString('') expression persaudes Power Automate to send an empty string.
Run time
To run a bulk delete job immediately set StartDateTime to a date time in UTC (e.g. utcNow()) and somewhat confusingly set RunNow to No. Note: RunNow is marked as an internal field, it may be legacy from earlier CRM versions.
Notify recipients
We can notify recipients, by specifying an email, or we can not set recipients by using an empty array, e.g. []
Summary
We now know how to use the BulkDelete action within a Power Automate Cloud Flow. We can use flow to create a one-time or recurring bulk delete job. The Power Automate cloud flow can be part of a solution, so don’t require additional scripting to setup bulk delete jobs in each environment.
Advantages
- We now have an ’editable’ bulk job.
- We can use a Power Automate ‘recurrence’ trigger to enable more flexible, conditional triggering of the bulk delete.
- Because flows are part of solutions we remove the requirement to maintain a bulk deletes during deployment.
Disadvantages
- The classic bulk delete UI is much simpler to configure. Consider if the complexity introduced with Power Automate Bulk Delete is justified, if you have strong ALM requirements, or are creating environments on demand it may well be.
References
- Basic payload to create BULK DELETE job using web api by Arun Vinoth (@arunvinoth)
- Microsoft documentation